
Learning how to make a bouquet is easier than you think. I have been there. You see gorgeous arrangements at florists and think there is no way you could make something that beautiful at home. But here is the secret. Professional florists use the same techniques you can learn in minutes. This guide will teach you everything you need to know about bouquet making, from choosing flowers to tying the perfect finishing ribbon.
Making your own bouquets saves money, allows you to use flowers from your garden, and gives you complete creative control. Whether you need a birthday bouquet, wedding centerpiece, or just want to brighten your kitchen table, these techniques work every time.
What Is a Bouquet?
A bouquet is an arrangement of flowers gathered and tied together for display or gifting. Unlike loose flowers in a vase, bouquets are designed to be held or placed in a vase as a cohesive unit. The word comes from the French word meaning “cluster of trees” or “thicket.” Bouquets range from simple handfuls of wildflowers to elaborate, multi-layered arrangements with dozens of blooms.
| Bouquet Type | Best For | Skill Level |
|---|---|---|
| Hand-tied bouquet | Gifts, everyday arrangements | Beginner |
| Round bouquet | Weddings, formal events | Intermediate |
| Cascade bouquet | Weddings, dramatic displays | Advanced |
| Loose garden bouquet | Casual settings, home décor | Beginner |
| Posy (small round) | Bridesmaids, small gifts | Beginner |
| Nosegay (herb & flower) | Historical events, themed parties | Intermediate |
Essential Tools for Bouquet Making
Before you learn how to make a bouquet, gather the right tools. Having everything ready before you start makes the process smooth and enjoyable. You do not need expensive florist tools. Most items are already in your kitchen or can be bought cheaply at craft stores.
| Tool | Purpose |
|---|---|
| Sharp floral shears or scissors | Cutting stems cleanly without crushing |
| Bucket of water | Holding flowers while you work |
| Floral tape | Securing stems, covering wire |
| Floral wire | Supporting heavy flowers, extending stems |
| Ribbon or twine | Tying the finished bouquet |
| Pruning shears | Cutting thick woody stems |
| Vase or container | Displaying finished bouquet |
| Thorn stripper | Removing rose thorns (optional) |
| Spray bottle | Keeping flowers hydrated |
| Garbage bag | Cleanup (stems, leaves, packaging) |
Before you start, make sure your shears are sharp. Dull scissors crush stems, which prevents water uptake and shortens the life of your flowers. Clean your tools with rubbing alcohol before working with different flowers to prevent disease spread.
How to Choose Flowers for a Bouquet
Choosing flowers is the most fun part of learning how to make a bouquet. A balanced arrangement typically includes three types of flowers: focal flowers, filler flowers, and greenery. Each plays a specific role in the final look.
Focal flowers are the stars of your bouquet. These are large, showy blooms that draw the eye. Examples include roses, peonies, sunflowers, dahlias, hydrangeas, lilies, and protea. Use 3 to 5 focal flowers in a standard size bouquet.
Filler flowers add volume and texture between the focal flowers. They are smaller and often have multiple blooms on one stem. Examples include baby’s breath (gypsophila), waxflower, statice, aster, chamomile, Queen Anne’s lace, and solidago.
Greenery provides structure, color contrast, and a natural look. It fills gaps and makes the focal flowers pop. Examples include eucalyptus, ferns, ivy, ruscus, leather leaf, salal, olive branches, and boxwood.
| Flower Type | Examples | Role |
|---|---|---|
| Focal | Rose, Peony, Sunflower | Main attraction |
| Filler | Baby’s breath, Waxflower | Volume, texture |
| Greenery | Eucalyptus, Fern, Ivy | Structure, contrast |
How Many Flowers Do You Need for a Bouquet?
The number of flowers depends on the size of bouquet you want. A small posy might use 5 to 7 stems total. A medium hand-tied bouquet uses 10 to 15 stems. A large, lush bouquet might use 20 to 30 stems. Here is a breakdown by bouquet size.
| Bouquet Size | Focal Flowers | Filler Flowers | Greenery Stems |
|---|---|---|---|
| Small (posy) | 3-5 | 3-5 | 3-5 |
| Medium | 5-7 | 5-10 | 5-10 |
| Large | 7-10 | 10-15 | 10-15 |
| Wedding (bridal) | 10-15 | 15-20 | 15-20 |
These numbers are guidelines, not rules. Trust your eye. If the bouquet looks sparse, add more filler. If it looks crowded, remove a few stems. The best bouquets are balanced, not overstuffed.
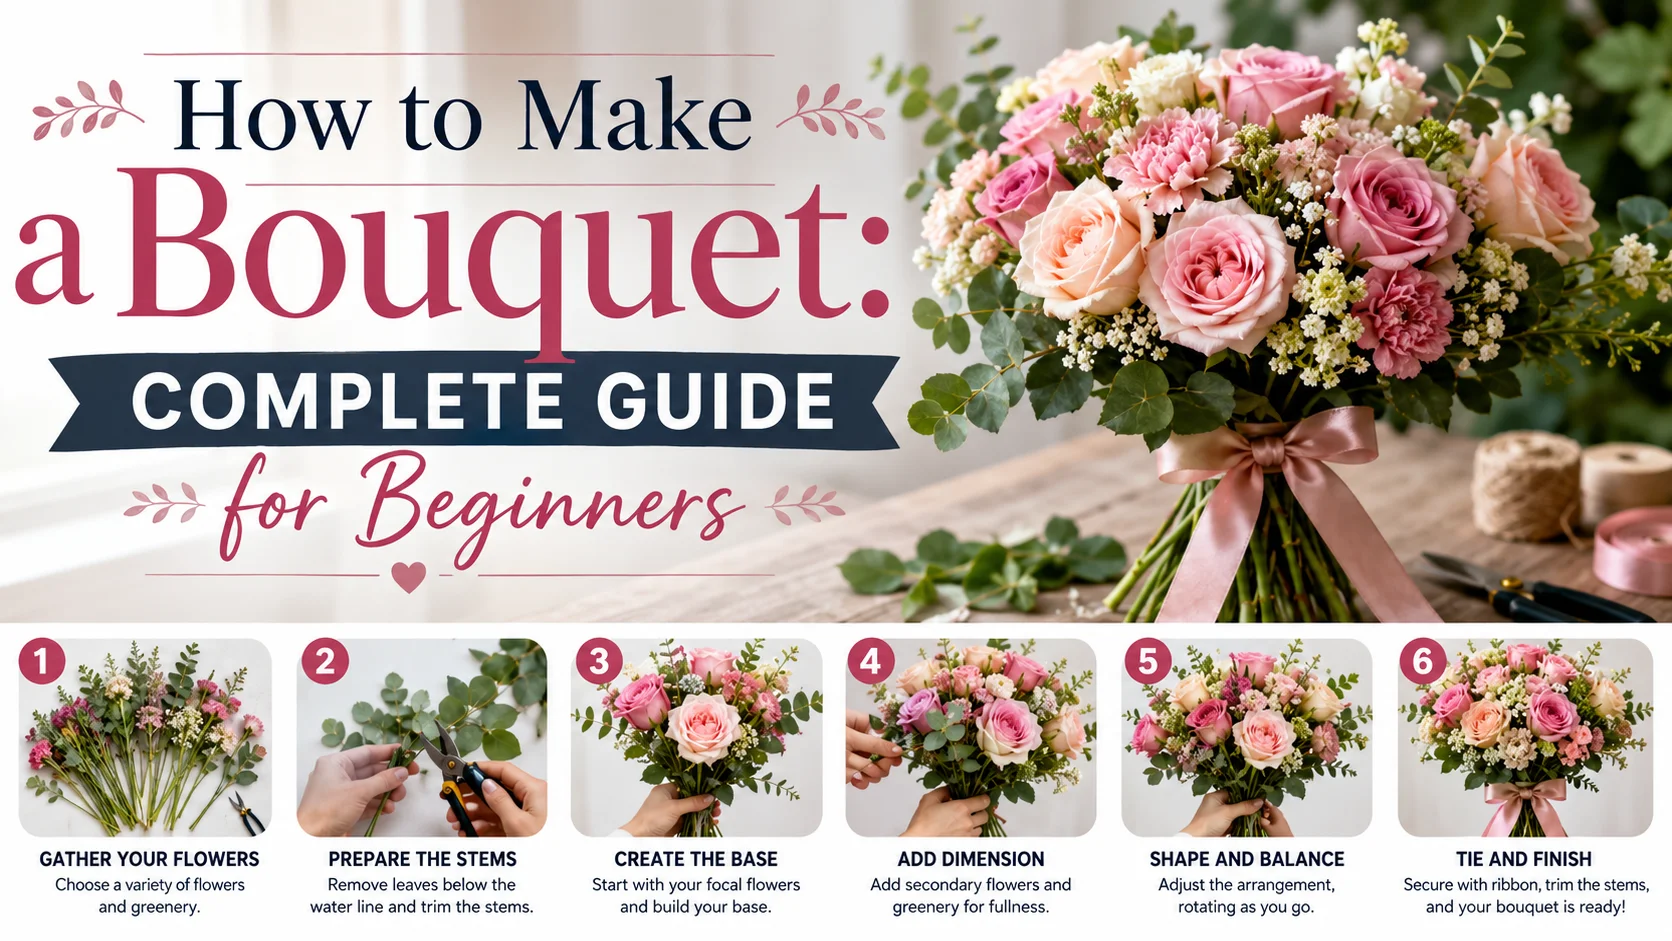
Step by Step: How to Make a Hand Tied Bouquet
The hand-tied bouquet is the most common style and the best place to start when learning how to make a bouquet. Here is the step by step process.
Step 1: Prepare Your Flowers
Remove any leaves that will be below the water line in the vase. Leaves left underwater rot quickly and breed bacteria. Also remove thorns from roses using a thorn stripper or the back of a knife. Cut each stem at a 45-degree angle. This increases the surface area for water uptake. Strip leaves from the bottom half to two-thirds of each stem.
Step 2: Start with Greenery
Gather 3 to 5 stems of greenery in your non dominant hand. Hold them loosely, like you are holding a wine glass. Cross the stems so they spiral around each other. This is called the spiral technique and it is the key to professional looking bouquets.
Step 3: Add Focal Flowers One at a Time
Add your largest focal flowers one by one, placing each at a slightly different angle. Insert stems into the spiral, not just on top of the existing stems. Rotate the bouquet in your hand as you work. Each new stem should go at a different angle than the previous one. This creates a round, even shape.
Step 4: Add Filler Flowers
Once you have placed 3 to 5 focal flowers, start adding filler flowers. Insert them between the focal flowers to fill gaps. Continue rotating the bouquet and adding stems until you are happy with the size and shape. Step back and look at the bouquet from all angles. Fill any holes where you can see through to your hand.
Step 5: Check the Shape
The bouquet should look good from every angle. The top should be rounded, not flat. The sides should be full, not sparse. The stems should spiral neatly toward the bottom. If the bouquet is lopsided, add more flowers to the sparse side. If the stems are crossing instead of spiraling, start over. Spiral technique takes practice.
Step 6: Secure the Stems
Once you are happy with the flower placement, wrap floral tape tightly around the stems about 3 to 4 inches below the flower heads. Wrap multiple times to secure. The tape will stick to itself. Then wrap ribbon or twine over the floral tape for a finished look. Start at the top of the wrapped area and work down. Tie a knot or bow at the bottom.
Step 7: Trim the Stems
Cut all stems evenly at the bottom so the bouquet stands flat in a vase or can be held comfortably. Cut at a 45-degree angle. Place the bouquet in water immediately. If the bouquet is a gift, wrap it in tissue or cellophane. Keep the stems wrapped in wet paper towels inside the wrapping.
The Spiral Technique Explained
The spiral technique is the most important skill in how to make a bouquet. When stems spiral around each other, they lock into place. The bouquet holds its shape without needing heavy wiring. When stems are all parallel, they slide apart. The bouquet falls apart easily.
To practice spiral technique, hold the stems loosely in your non dominant hand like you are holding a wine glass. Add each new stem at a 45-degree angle, crossing over the previous stems. Rotate the bouquet slightly after each addition. Your thumb and forefinger are the pivot point. The stems should fan out from that point like the spokes of a wheel.
| Do This | Avoid This |
|---|---|
| Hold stems loosely | Grip stems tightly |
| Add stems at angles | Add stems parallel |
| Rotate the bouquet | Keep bouquet still |
| Cross stems over each other | Stack stems on top |
| Let stems spiral naturally | Force stems into place |
How to Choose Color Combinations
Color is one of the most important elements in how to make a bouquet. The right colors make a bouquet stunning. The wrong colors can clash and look messy. Here are foolproof color schemes that always work.
Monochromatic uses different shades of the same color. Light pink roses, medium pink peonies, and dark pink carnations. This creates a sophisticated, elegant look.
Analogous uses colors next to each other on the color wheel. Yellow, yellow-orange, and orange flowers. This creates a warm, harmonious feel.
Complementary uses colors opposite each other on the color wheel. Purple and yellow. Blue and orange. Red and green. This creates high contrast and visual excitement.
Triadic uses three colors evenly spaced on the color wheel. Red, yellow, and blue. This is bold and playful.
| Color Scheme | Colors | Mood |
|---|---|---|
| Monochromatic | Single color, multiple shades | Elegant, sophisticated |
| Analogous | Neighbors on color wheel | Harmonious, calm |
| Complementary | Opposite colors | Bold, energetic |
| Triadic | Evenly spaced | Playful, balanced |
| Pastel | Soft, muted tones | Romantic, gentle |
| Bright | Pure, saturated colors | Cheerful, energetic |
How to Prepare Fresh Cut Flowers
Fresh cut flowers last longer if you prepare them correctly. This step is essential in how to make a bouquet that stays beautiful for days or weeks.
| Step | Action |
|---|---|
| 1 | Fill a clean bucket with lukewarm water |
| 2 | Remove all leaves below the water line |
| 3 | Cut stems at 45-degree angle under running water |
| 4 | Remove thorns from roses |
| 5 | Place flowers in water immediately |
| 6 | Let flowers hydrate for 2-4 hours before arranging |
| 7 | Add flower food to water |
| 8 | Change water every 2 days |
| 9 | Recut stems every 2-3 days |
| 10 | Keep away from direct sun, heat, and fruit |
Cut stems under water prevents air bubbles from blocking water uptake. Air bubbles act like clots, preventing water from reaching the flower head. Cutting at an angle increases the surface area for water absorption and prevents the stem from sitting flat on the bottom of the vase.
How to Make a Bouquet with Garden Flowers
Using flowers from your own garden is rewarding and cost effective. Here is how to make a bouquet with garden flowers.
Cut garden flowers in the early morning or late evening when they are fully hydrated. Avoid cutting in the heat of midday. Use sharp shears and cut at a 45-degree angle. Place cut stems immediately in a bucket of water. Strip all leaves that will be below the water line. Bring the flowers inside and let them rest in water for several hours before arranging.
Garden flowers are often less uniform than florist flowers. Embrace this. A slightly wild, asymmetrical bouquet has charm and character. Use a mix of perennials, annuals, flowering shrubs, and herbs. Lavender, rosemary, and mint add fragrance and texture.
| Best Garden Flowers for Bouquets | Bloom Season |
|---|---|
| Zinnias | Summer to fall |
| Sunflowers | Summer to fall |
| Dahlias | Summer to fall |
| Peonies | Late spring |
| Roses | Late spring through fall |
| Hydrangeas | Summer |
| Cosmos | Summer to fall |
| Sweet peas | Spring to early summer |
| Lavender | Summer |
| Marigolds | Summer to fall |
How to Wrap a Bouquet
Wrapping a bouquet protects the flowers and makes it gift ready. Here is how to make a bouquet look professionally wrapped.
Cellophane Wrap
Lay a sheet of cellophane flat on a table. Place the bouquet diagonally across the center. Fold the bottom corner up over the stems. Fold the left corner over, then the right corner. Gather the cellophane around the stems and tie with ribbon. This creates a classic florist wrap.
Tissue Paper Wrap
Layer 2 to 3 sheets of tissue paper in different colors. Place the bouquet in the center. Gather the paper up around the flowers, letting the edges flare out. Tie with ribbon at the stems. This looks soft and romantic.
Brown Paper Wrap (Rustic)
Use kraft paper or brown packing paper. Cut a square large enough to wrap around the flowers. Place the bouquet diagonally. Fold the bottom corner up, then roll the bouquet in the paper. Tie with twine or jute. This is perfect for wildflower and garden bouquets.
| Wrap Type | Best For | Difficulty |
|---|---|---|
| Cellophane | Formal gifts, weddings | Easy |
| Tissue paper | Romantic occasions, birthdays | Easy |
| Brown paper | Rustic, garden style | Easy |
| Fabric (muslin) | Reusable, eco-friendly | Moderate |
| Ribbon only | Minimalist, hand-tied | Easy |
How to Make a Bouquet Last Longer
Knowing how to make a bouquet is only half the skill. Keeping it beautiful is the other half. Follow these care tips to extend the life of your arrangement.
| Care Tip | Why It Works |
|---|---|
| Change water daily | Prevents bacterial growth |
| Recut stems every 2 days | Removes blockages, improves water uptake |
| Remove wilted flowers | Ethylene gas from dying flowers speeds decay |
| Keep away from fruit | Fruit releases ethylene gas |
| Avoid direct sun | Heat speeds wilting |
| Keep away from drafts | Wind dehydrates flowers |
| Mist flowers with water | Replaces lost moisture |
| Use flower food | Provides sugar and antibacterial agents |
| Keep in cool room | Lower temperature slows aging |
| Remove leaves below water | Prevents bacterial growth |
How to Make a Dried Flower Bouquet
Dried flowers last for months or years. Here is how to make a bouquet with dried flowers.
Drying Methods
Air drying: Tie flowers in small bundles and hang upside down in a dark, dry, well ventilated space for 2 to 4 weeks. This works best for lavender, statice, baby’s breath, and hydrangeas.
Silica gel: Bury flowers in silica gel in an airtight container. This preserves color and shape but takes only 2 to 4 days. Works for roses, peonies, and dahlias.
Pressing: Place flowers between sheets of paper inside a heavy book for 2 to 4 weeks. Pressed flowers are flat, not dimensional. Use for cards, framing, and collage.
| Drying Method | Best For | Time Required |
|---|---|---|
| Air drying | Lavender, statice, baby’s breath | 2-4 weeks |
| Silica gel | Roses, peonies, dahlias | 2-4 days |
| Pressing | Pansies, violets, ferns | 2-4 weeks |
| Microwave pressing | Small flowers | Minutes |
| Glycerin | Leaves, eucalyptus | 2-6 weeks |
Common Bouquet Making Mistakes to Avoid
Even experienced flower arrangers make mistakes. Here are common errors in how to make a bouquet and how to fix them.
| Mistake | Fix |
|---|---|
| Stems too long or short | Trim to proportion. Bouquet stem length should be 1.5 to 2 times the flower head diameter |
| Bouquet too tight | Leave space between flowers for air circulation. Tight bouquets rot faster |
| Stems not spiraling | Practice. Start over. Spiral technique is essential |
| Colors clashing | Remove conflicting colors. Stick to 2-3 colors maximum |
| Too many flower types | Simplify. 3-4 flower types maximum for beginners |
| Leaves in water | Remove all leaves below water line |
| Dirty vase | Wash vases with soap and bleach between uses |
| Crowding the vase | Leave room for water. Too many stems block water flow |
| Flowers touching fruit | Move fruit away. Ethylene gas kills flowers |
| Using dull shears | Replace or sharpen shears. Dull blades crush stems |
Budget Bouquet Tips
You do not need expensive flowers to learn how to make a beautiful bouquet. Here are budget friendly tips.
Use seasonal flowers. In-season flowers cost less and last longer. Out-of-season flowers are shipped from far away and cost more. Shop at farmers markets. Local flowers are cheaper than imported florist flowers. Grow your own. Seeds and bulbs cost pennies compared to cut flowers. Use foliage as filler. Greenery costs less than flowers and adds volume. Buy in bulk. Wholesale flower markets sell by the bunch at lower prices. Repurpose grocery store bouquets. Take apart inexpensive bouquets and rearrange them with greenery from your yard. Use wildflowers. With permission, gather wildflowers from roadsides and fields.
| Budget Source | Cost | Quality |
|---|---|---|
| Your garden | Free | Excellent |
| Farmers market | Low | Very good |
| Grocery store | Low to moderate | Good |
| Trader Joe’s | Low | Good |
| Costco/Sam’s | Low per stem | Very good |
| Wholesale market | Low per bunch | Excellent |
| Roadside wildflowers | Free | Variable |
| Florist shop | High | Excellent |
Seasonal Bouquet Ideas
The best bouquets use flowers that are naturally in season. Here are ideas for each season.
Spring Bouquet
Tulips, daffodils, hyacinths, ranunculus, anemones, lilacs, and flowering cherry branches. Colors: Pastel pink, yellow, white, lavender.
Summer Bouquet
Roses, sunflowers, dahlias, zinnias, cosmos, hydrangeas, lavender, and eucalyptus. Colors: Bright red, orange, yellow, hot pink, purple.
Fall Bouquet
Chrysanthemums, dahlias, asters, goldenrod, sunflowers, ornamental kale, and dried grasses. Colors: Orange, burgundy, gold, deep red, brown.
Winter Bouquet
Amaryllis, paperwhite narcissus, poinsettias, hellebores, evergreens, and berries. Colors: Red, white, green, deep pink.
| Season | Featured Flowers | Color Palette |
|---|---|---|
| Spring | Tulips, daffodils, peonies | Pastels, soft pinks, yellows |
| Summer | Roses, sunflowers, dahlias | Brights, warm tones |
| Fall | Chrysanthemums, asters | Oranges, burgundies, golds |
| Winter | Amaryllis, hellebores | Reds, whites, greens |
FAQs
What is the easiest bouquet to make for a beginner?
The hand-tied round bouquet using the spiral technique is the easiest for beginners. Start with hardy flowers like carnations, mums, and baby’s breath. Use greenery like eucalyptus or ferns. Focus on the spiral technique and do not worry about perfection.
How many flowers do I need for a bridal bouquet?
A medium bridal bouquet typically uses 15 to 25 stems total. This includes 8 to 12 focal flowers, 5 to 8 filler flowers, and 5 to 10 greenery stems. Larger cascading bouquets may use 30 to 50 stems.
Can I make a bouquet a day before I need it?
Yes. Make the bouquet the day before and store it in a cool place. Keep the stems in water. Mist the flowers lightly. Do not store in the refrigerator unless it is a dedicated flower fridge (fruit releases ethylene gas). A cool basement or garage is better.
What is the best ribbon for tying bouquets?
Satin ribbon is classic for formal bouquets. Velvet ribbon adds luxury. Burlap ribbon is perfect for rustic styles. Cotton twine or jute works for garden style bouquets. Use floral tape under the ribbon to secure the stems first.
How do I keep my bouquet from falling apart?
The spiral technique is the answer. When stems spiral around each other, they lock into place. Add floral tape or a rubber band before wrapping with ribbon. For heavy flowers, use floral wire to secure individual stems to the main bundle.
What flowers should I avoid using in bouquets?
Avoid flowers with milky sap like poinsettias and euphorbia. The sap can irritate skin and shorten vase life. Avoid flowers that wilt quickly like hydrangeas unless you take special care. Avoid highly fragrant flowers if the recipient has allergies or sensitivities.
Conclusion
Learning how to make a bouquet opens up a world of creativity. You no longer have to rely on expensive florists for every occasion. Your garden becomes your flower shop. Your kitchen table becomes your design studio. The spiral technique might feel awkward at first. Keep practicing. After a few tries, your hands will learn the motion. After a dozen bouquets, you will do it without thinking. So here is your challenge. Gather some flowers this week. It does not matter if they are from your garden, a grocery store, or a roadside. Just gather them. Follow these steps. Make your first bouquet. It might not be perfect. That is okay. The second one will be better. The tenth one will be stunning. Start today. Your future bouquets are waiting to be made.

Ethan Carter is a nature enthusiast and content writer with a passion for flowers and botanical knowledge. He is the author behind FlowerNamez, where he shares simple and informative content about flower names, types, and meanings.
With a focus on clarity and accuracy, Ethan aims to help readers explore the beauty of flowers and understand their significance in everyday life.